
How We Created the Ultimate Wall of Wrapped Presents at Lemon Drop Studios
At Lemon Drop Studios, we’re always looking for ways to make photo sessions magical—and this holiday season, we knew we wanted something extra special. Enter: the Wall of Wrapped Presents 🎄✨ A stunning, festive backdrop that instantly sets the scene for joyful family photos, holiday mini sessions, and even cozy content for your brand.
Whether you’re a fellow studio owner, a boutique shop dreaming up a window display, or just someone wanting to add a little holiday magic to your home, this setup is totally do-able—and we’re going to show you how!

The Inspiration
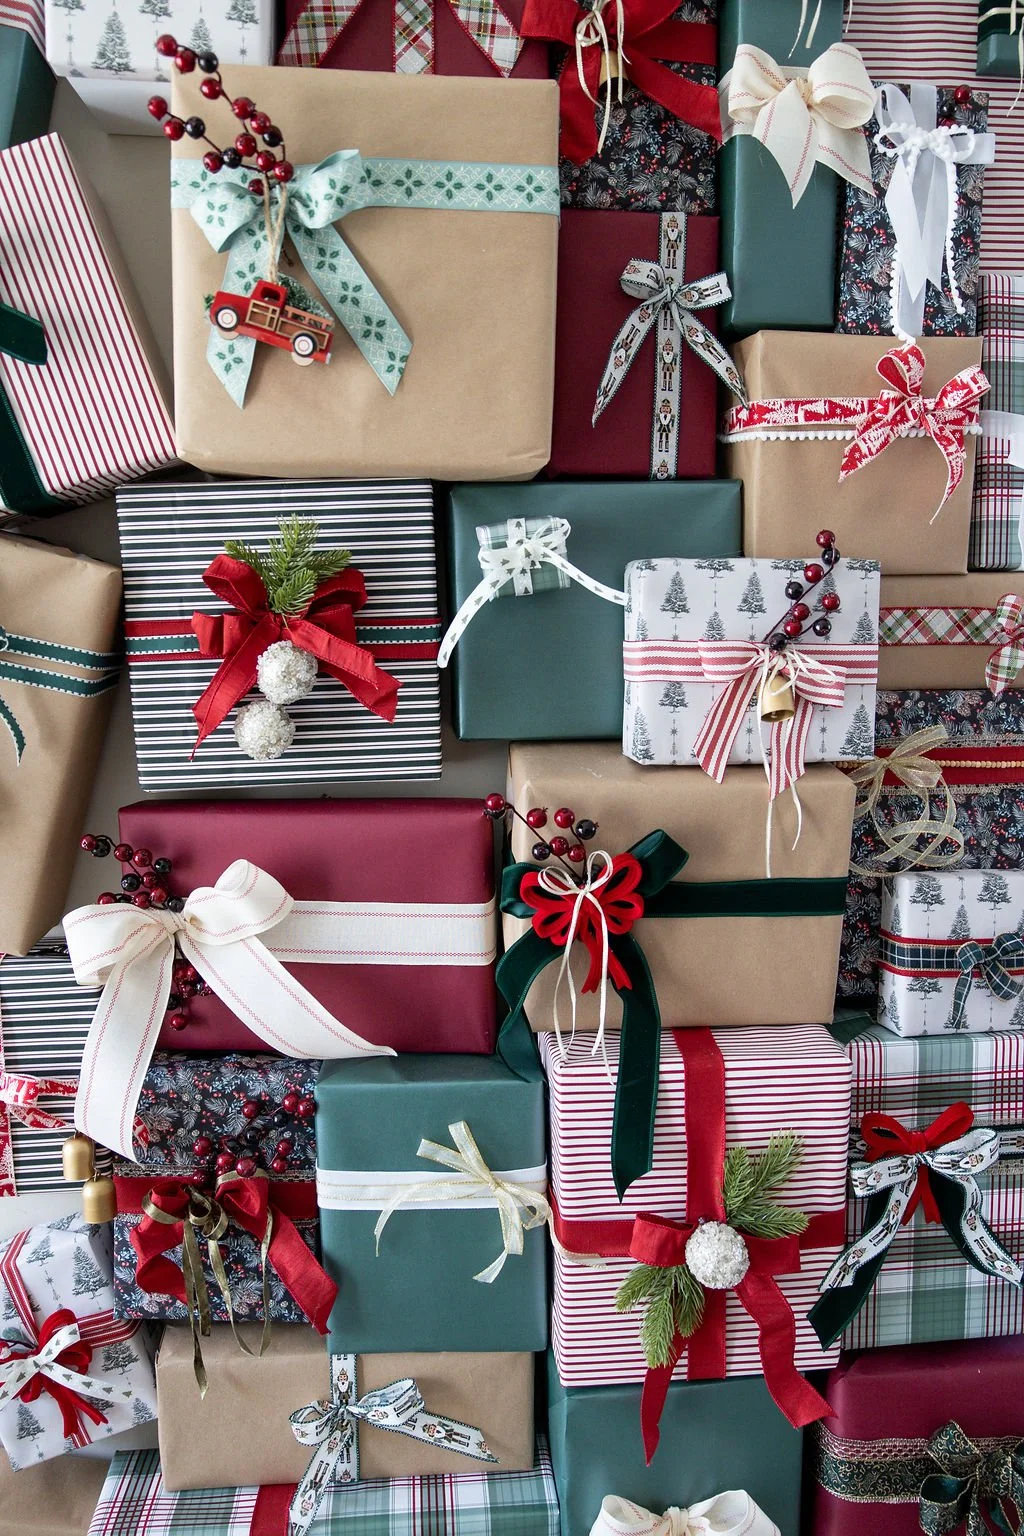
Every year at Lemon Drop Studios, we aim to create a holiday backdrop that feels both nostalgic and fresh—something that makes people want to step in front of the camera. This year, we were inspired by the classic charm of beautifully wrapped Christmas presents. There's just something magical about stacks of gifts in rich reds, deep greens, cozy plaids, and shimmering golds—it instantly brings to mind childhood memories, family gatherings, and the joy of giving.
We also had a practical goal: to create something visually impactful without blowing the budget.
That’s what made the Wall of Wrapped Presents the perfect idea. It gave us the scale we needed to create a statement—something large enough to fit entire families in front of—but without the expense of building an elaborate set. Boxes are inexpensive (or free, if you reuse what you have), and wrapping paper is one of the most affordable ways to add texture, color, and personality to a backdrop.
Best of all, this project allowed us to stay true to our studio’s brand—elegant, fun, and a little unexpected. By carefully curating the color palette and mixing traditional elements with a few quirky touches (like vintage ribbons or handmade tags), we created something that felt high-end without the high price tag.
It was a beautiful reminder that sometimes, the most striking ideas come from the simplest concepts—just reimagined in a bold way.


Where We Got Our Supplies
To make it all come together, we shopped a mix of big box stores and Etsy gems. Here's where we found the goods:
📦 Boxes & Fillers
U-Haul & Home Depot: We stocked up on small to medium moving boxes—super affordable and sturdy enough to stack.
Amazon: Great for ordering bulk sizes if you're planning a large wall. Don’t be afraid to ask friends for these too!
Local boutique stores: A few boxes were saved from actual shipments we received (bonus recycling points!).
🎀 Wrapping Paper
Amazon: When ordering early in the season, Amazon was a lifesaver! We got our red stripped, craft brown, burgundy, and emerald green wrapping paper from HERE
Etsy: For a few standout, unique designs that added personality we looked to Etsy. We got the other stripped wrapping paper HERE. We got the pinecone wrapping paper HERE. We got the Christmas tree wrapping paper HERE.
🎁 Ribbons, Bows & Extras
Hobby Lobby: They had a massive selection of wired ribbons, velvet bows, and holiday trimmings. This is where we got the sprigs of greenery, small ornaments, and largest amount of ribbon at.
At Home: We loved the selection at At Home. We got the green and white ribbon HERE. We got the red and white twill ribbon HERE. We got the larger red and white stripped ribbon HERE.
Assembly Tips
Mix Sizes & Shapes: Varying the box sizes makes the wall feel dynamic. We made sure to have large boxes all the way down to tiny “ring size” boxes. This gave us the ability to layer the boxes not only next to each other but sometimes even small boxes directly on the smaller ones like in the photo above.
Layer & Stack: Start with a sturdy base layer and build up. Think large and medium size boxes first and then the smaller boxes can fill gaps that you start to see. Placing and designing the boxes on the ground first can be a helpful tip. We used gorilla tape and hot glue to ensure the boxes stayed up on the wall. The mixture of both made it very sturdy!
Color Blocking: We would wrap and add bows to about 5-6 boxes at a time in various patterns then place them on the wall. This would help use insure we weren’t over using one pattern or ribbon more than the other and would help use dictate which wrapping papers we needed to use next. We made sure not to have the same wrapping paper next to each other. Having at least 5 different kinds of wrapping paper (we had 7) makes not having duplicate papers next to each other easier. We had over 12 kids of ribbon.
Add Details: Little touches—like sprigs of faux greenery, small gold bells, mini ornaments, and handwritten tags—make it feel magical and real. We added all of these with just hot glue and it was so cute!

Want to Make Your Own?
You totally can! Whether you recreate this look in a studio, store window, or a cozy corner of your living room, the beauty is in the details—and the joy it brings. You don’t need to spend a fortune; just get creative with wrapping styles, add texture with ribbons and layers, and have fun arranging your "presents" like a puzzle on the wall.
You can use traditional colors like we did here, or use colors to match your brand or business.
If you try this at your own space, tag us on Instagram (@lemondropstudios)—we’d LOVE to see how you bring the magic to life! 💛🎄